

With schools shut down for the rest of the year in many parts of the country (and for yet-to-be-determined periods of time in other areas), parents throughout America have been stuck listening to the all-too-familiar drone of “I’m bored” and “There’s nothing to do” for several weeks. And with stay-at-home orders impacting many families and mandatory shutdowns making it impossible to go out and enjoy a day together as a family, it may seem like there is no end in sight.
Fortunately, there is hope.
While you may not be able to take your kids to the zoo or an amusement park, there are plenty of ways to keep them busy. In fact, there are tons of fun projects that are appropriate for kids of all ages and use common household items. In other words, you probably already have everything you need to fight boredom and give your kids something fun to do. Keep scrolling to check out some cool kid-friendly DIY projects that use household items!
Color Changing Milk Experiment
If you have a science lover in your house and you have milk, four colors of food coloring, cotton swabs and dish soap, this project is for you. It might get a bit messy, but it is by far one of the coolest and simplest kitchen chemistry experiments out there, and your kids are sure to love it.
First, pour enough milk onto a dinner plate to cover the bottom by about ¼-inch or so. You don’t have to be precise here, but filling it too full makes messes more likely while underfilling may prevent the experiment from working properly.

Once the milk has settled, add a single drop of four different colors of food coloring to the milk. The drops should be close together (but not touching) and in the middle of the plate.
Next, ask your child to predict what they think will happen when they touch the cotton swab to the middle of the milk. Once they’ve made their prediction, try it. Be careful not to stir the mix, though. You only want to touch it with the very tip of the swab.
Now, apply a drop of liquid dish soap to the cotton swab’s other end and ask your child to predict what will happen. Place the soapy end in the center of the milk and hold in place for 15 seconds or so without stirring. Watch how the food coloring spreads outward and creates a beautiful display.


Add another drop of soap to the swab and try again. Place the swab at different spots in the milk to see what happens. Remove the cotton swab and encourage your child to watch the colors continue to move after it’s gone. Ask them why they think this is happening.
Finally, explain how it all works. Once your child knows the science behind the experiment, consider starting over with a fresh plate of milk so they can see the chemistry in action. This project is great for young kids, but it’s fun for older ones, too.
Custom-Dyed T-Shirts
If you are looking for a project that’s more crafty and less scientific in nature, consider dying t-shirts. Since there are many ways to customize blank t-shirts and other apparel, this is a project that is enjoyable for kids and adults alike. After all, who wouldn’t love making one-of-a-kind clothing that they can show off?


Making coloring shirts is a fun project for little ones. Add coloring book outlines to kids blank t-shirts and then encourage your children to color them in using markers. If you use washable markers, they’ll be able to redo their shirt after every washing. Using permanent markers, on the other hand, results in shirts that can be worn time and time again.
If you have older kids or tweens, you might want to tie-dye shirts using food coloring or learn how to dye cotton t-shirts with food. Both projects are undeniably messy, but they are a lot of fun–especially for burgeoning fashionistas.
Rolled Paper Beads
Making rolled paper beads is a project that’s fun for girls and boys alike, and it’s even one that you can incorporate into an art or history lesson. Rolled paper beads have been around since the Victorian era and they are a lot of fun to make and wear.
To make them, you’ll need paper, scissors, a skewer and glue. You can use any type of paper you prefer, but colorful pages from magazines work especially well. Cut long, narrow triangles out of the paper. Hold the bottom end of a triangle against a skewer and then wrap the paper around and around until you reach the tip. Add a dab of glue to the end to hold it in place. For extra durability, spread glue thinly over the surface of the bead. Let dry.
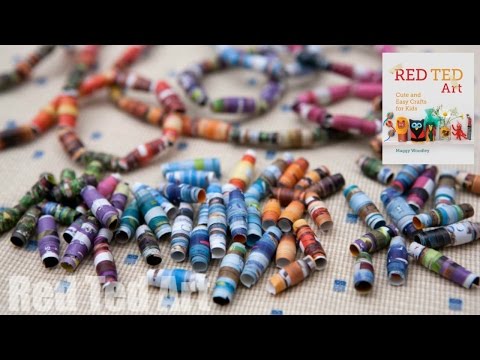
Once dry, rolled paper beads can be used to make necklaces, bracelets and more. Just remember not to get them wet! While the glue gives them a bit of protection, the beads won’t last long if exposed to water.
“Stained Glass” Candle Holders
If you have small glass jars, tissue paper and white glue or Mod Podge, you have everything you need for your child to make beautiful “stained glass” candle holders. A paintbrush comes in handy when it comes to minimizing the mess, but if you don’t have one, fingers work, too.


Start by thoroughly removing all labels and glue from the jars. Wash and dry completely. Tear tissue paper in various colors up into tiny scraps. Try to tear it into different shapes while keeping the size roughly similar. Dip your fingers or paintbrush in glue or Mod Podge and then use it to adhere a piece of tissue paper to the outside of the jar. Make sure the paper is completely saturated but not dripping wet. Repeat until the entire jar is covered and then let dry. If there are any paper edges that extend above the jar’s opening, cut them off.
Chances are, you have all sorts of items in your home that can be used in various kid-friendly projects. Try one of the projects listed above or get creative and come up with one on your own.